The lamp is a high pressure mercury type. If a catastrophic failure of
the lamp should occur, avoid touching glass debris or inhaling mercury
vapor fumes. Initiate contact/spill measures. Wear a full-face protection
visor.
The UV light produced by the lamp can cause erythema of the skin (similar
to sunburn), conjunctivitis and possible retinal burn that could result
in blindness. Though the operator is protected from direct exposure to
UV light it is recommended that the operator does not look at the mask/wafer
assembly at the time of the exposure; indirect UV light may also harm the
eye retina.
The system employs infrared lasers for stage and focus control. The operator
should avoid placing any parts of the body in the path of the laser beam.
The quartz-glass lamp envelope should never be touched, as any contamination
may result in thermal stress leading to fracture. To minimize contamination
and reduce leverage stress of the envelope, handle the lamp by the metal
end upon which work is being performed.
Procedure:
Computer ALT+F1 (setup/config. mode).
Computer Menu: <File> <Exit>.
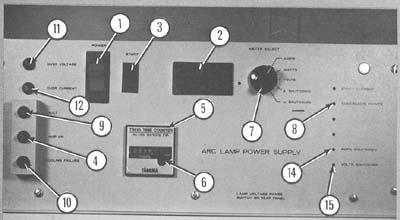
At the ARC LAMP POWER SUPPLY located at the top-right of the equipment
rack, switch OFF the lamp power.
Wait 30 minutes for the lamp to cool and electricity to discharge from
the system.
Unlock the maximus column spindle lock knob. Rotate the column to position
the alignment microscope over the reticle platen. Lock the spindle lock
knob.
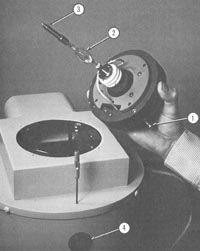
Open the environmental enclosure side doors closest to the lamp housing.
On the top of the lamp enclosure are two knurled screws which secure the
lamp fixture to the lamp housing. The screws are captive to the lamp fixture.
Fully loosen the two screws.
Lift the lamp fixture straight up from the lamp housing.
Unscrew the lamp from the lamp fixture.
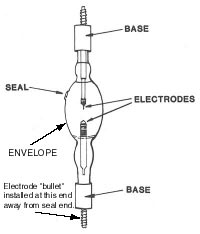
Unscrew the lamp extension electrode ("bullet") from the lamp.
Remove pre-installed nuts from the new lamp.
Install the "bullet" to the new lamp at the end opposite from the lamp
envelope seal (small bump on the envelope).
Install the lamp to the lamp fixture.
Install the lamp fixture to the lamp housing by lowering it straight down
into the housing and aligning the electrical contact pins on the fixture
to their sockets in the housing. There are black magic-marker alignment
marks on the lamp fixture and lamp housing to aid in rough orientation.
Tighten the knurled fixture screws.
Package the old used lamp in the packaging which contained the new lamp.
Label the package "USED". Place in lamp drawer for later HAZMAT disposal.
Close all enclosure doors.
Confirm the meter selector switch is set to WATTS.
At the ARC LAMP POWER SUPPLY, switch the lamp power to ON, immediately
followed by pressing the START button for a few seconds.
Confirm the lamp start by observing increasing meter wattage.
Upon the meter reaching 350 watts, power-up computer.