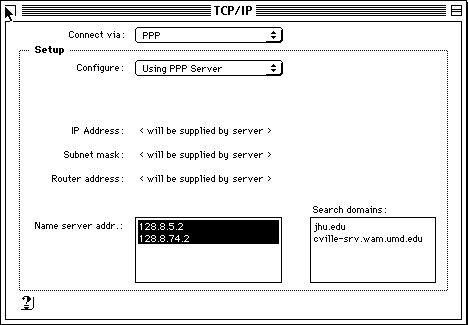
TCP/IP Control Panel, version 1.3
2. Edit your .login file (to prevent local news from diverting the login process). At the % prompt, type
pico .login
and press return. Cursor down to the line that says "readlocalnews -n csc.news" and insert a # character before the for character so that it looks like
# readlocalnews -n csc.news
Then save the file, quit pico, and logout.
1. Open the TCP/IP control panel and set it up like so.
Click on the close box (upper left-hand corner) and click Save if it asks you if you want to save.
2. Open the Modem control panel.

Click on the "Connect via:" pop-up menu and select either "internal modem" if you have an internal modem or "modem port" if you are connecting to an external modem throught your modem port. Then click on the "modem:" pop-up menu and select the modem that you have. Click on the close box (upper left-hand corner) and click Save if it asks you if you want to save.
3. Open the PPP control panel.
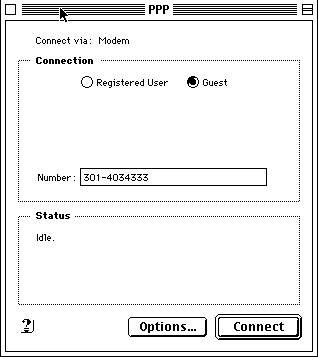
Click on "Guest". Enter the telephone number appropriate to your location. (301-4034333 is the number of the College Park public modem pool).
The following steps will create a script that will automate the log-in process in the future. Click on the Options... button. Click to select "Connect to a command-line host" and "Use terminal window". The click OK.
Make sure your modem is connected, turned on, and connected to a phone line. Now click Connect.
When the modem completes its connection, you will see a "PPP Terminal" window like this:
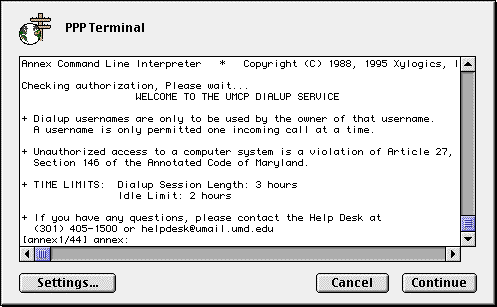
Next, type
rlogin wolfe
at the annex: prompt in the PPP Terminal window and press RETURN, then type in your user name and password when prompted.
Then, at the % prompt, type:
~jpcampb/slirpA -b 14400 -P
and press RETURN.
When the PPP Window says "SLIRP ready...", click on Continue. The system will respond by displaying a Save dialog box asking you to save the "connect script" that the system just recorded for you. Type SLIRP in the file name box and click Save. You can save this script anywhere on your computer (remember where - you'll need it in the next step).
Now, return to the PPP control panel, click Options..., select "Use Connect script:", click the "Import Script" button, navigate to where you saved the SLIRP script, double-click on SLIRP, and click OK.
You can now disconnect from PPP by clicking on the Disconnect button on the PPP control panel. Click Save when it asks you if you want to save the configuration. That's it! The next time you use PPP, all this will be automated.
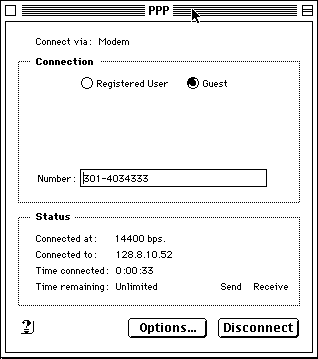
2. Wait for the dialing and connection sequence to be completed.
3. If it connects correctly, the PPP box will look like this:
You may now launch your network applications (e.g. Netscape, Internet Explorer, Eudora, Telnet, Fetch, etc. etc.). Happy graphical surfing!
4. For various reasons, PPP may not connect the first time (the line may be busy, etc). If you get an error message, just try again. Don't give up too soon.
5. To check your email in PINE without quitting Netscape, use the Better Telnet program, select the Open Connection command in the File menu, type in the name of your favorite machine (Wolfe, Marlowe, etc.) into the Host/Session Name box, click on Connect, then login as usual. You can have your email running at the same time as your Web browser if you wish.
You can download various version of Netscape and other network software from http://www.inform.umd.edu/CompRes/H+S/Software/Macintosh/Internet-WWW-Mac/ or from http://forum.swarthmore.edu/workshops/workshop.software.html.
6. When you are finished, quit your network applications and click on the Disconnect button the PPP control panel.
[GO BACK] to the Handouts page.